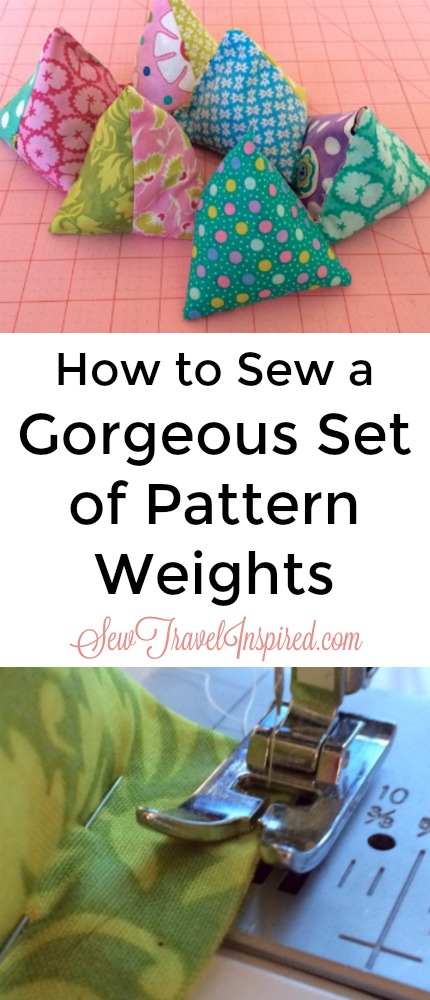
A sewist friend of mine had a birthday this month. I wanted to give her something practical and something with a sewing theme. I knew upfront a tote bag was out of the question. Tote bags are her specialty. It took a little bit of pondering but I came up with what I think is a great gift.
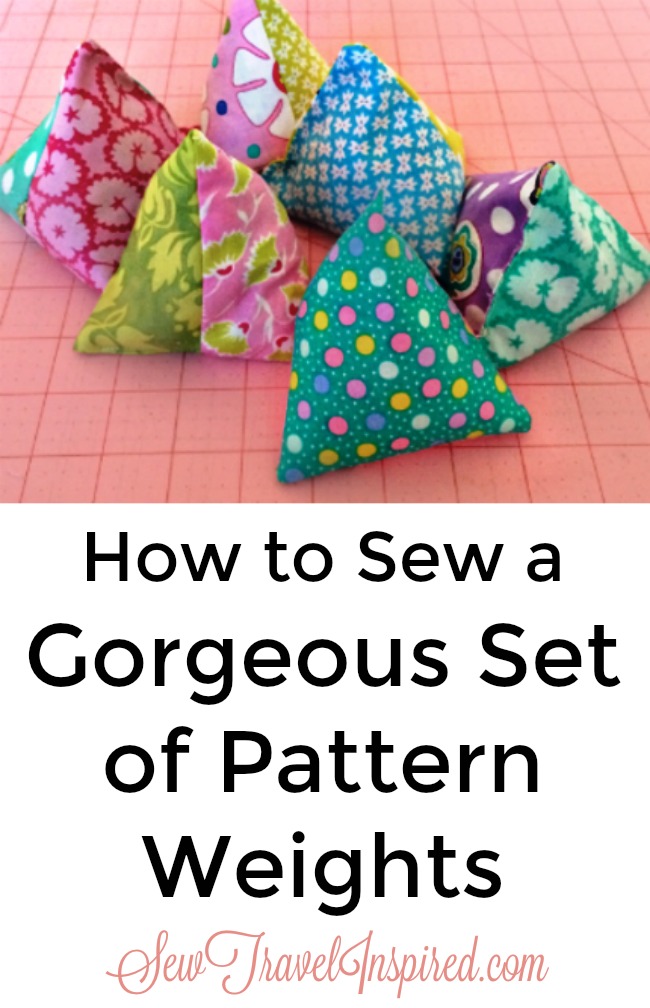
Set of 6 pattern weights
All sewists need a set of pattern weights. If they’re gorgeous as well as practical, well then, all the better. Pattern weights are not going to replace pins but there are times when pins do not do the trick. Pins can cause fabrics to wrinkle, bulge, and stretch. Pins can also tear pattern pieces and pinning takes so much time.
I have copied some of my most used patterns onto heavier weight paper. Smaller patterns like bibs are on cereal boxes. Have you ever tried to pin through a cereal weight cardboard? I use a pattern weight or two to hold the pattern down and a rotary cutter to cut it out. This method takes less time than it would if I were pinning and cutting with scissors. I use this same method when cutting knits. Pins can stretch and distort knit fabric. Other materials like vinyl, faux leathers, PUL, chiffon, and other delicate fabrics can be snagged and damaged by the use of pins.
Pattern weights come in all shapes and sizes. You can search Pinterest and YouTube and come up with lots of alternatives. (You can find a set of four on Amazon for about $14.) I prefer to make my own and use the fabrics and colors I like. This is the perfect project for the new (or experienced) sewist to add a new tool to her sewing kit. We will be making a set of 6 pattern weights.
![]()
![]()
![]()
![]()
For this project we are going to need:
12 – 5 inch squares( I used left over pre-cuts from a charm pack. These are already cut 5 inch squares. You can cut your own.)
2 pounds of lentils (This will fill 6 pattern weights,)
Coordinating thread, scissors, pins, and a funnel.
My left over squares are from a Moda charm pack designed by Me and My Sister Designs called LOL
Step one With the right sides of the squares together sew the three sides of the squares using a ½ inch seam allowance. Be sure to back stitch at the beginning and end of the seams. Press to set the seams.
![]()
![]()
![]()
![]()
Step two For the remaining side you will be matching up the two seams that are opposite each other. Make sure it is centered. Mark an inch and half gap roughly in the center for turning you piece right side out. Back stitch at both ends of the gap as well as the beginning and end of the seam. We will use the same ½ inch seam allowance.
For the remaining side match the seams in the middle
Mark the gap to help you remember when to back stitch. pick up the presser foot and move to the next pin. back stitch and continue sewing to the end of the seam.
Step three Clip the corners to reduce bulk making sure you don’t cut the seam stitching. Turn it right side out through the gap. Use the funnel to fill the pattern weight. The pattern weight can be loosely filled. Use a pin to hold the lentils away from the opening while stitching the gap closed. You can close the gap by hand-stitching or machine stitching the opening. I prefer the machine.
Clip all four corners to reduce bulk.
The trick is to be sure you opening is large enough for your funnel and that the funnel opening will accommodate the lentils without a bottleneck.
![]()
![]()
![]()
![]()
It is easiest to sew the gap closed with the bulk of the pattern weight to the left of the needle. Use a pin to keep the lentils away from the area where you are sewing.
Repeat this process 5 more times and you will have a gorgeous set of 6 pattern weights. Add to this a lovely drawstring storage bag and you have a great gift for your sewist friend or a wonderful new tool for your sewing kit.
![]()
![]()
![]()
![]()
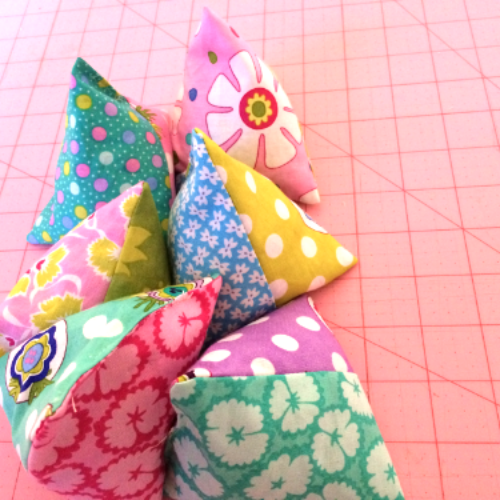
All I need to do is add a drawstring storage pouch and my gift is all ready to be delivered.
![]()
![]()
![]()
![]()
**Update** To sew a pouch to store the pattern weights in How to Sew the Very Versatile Drawstring Pouch.
[optin-cat id=”4559″]
![]()
![]()
![]()
![]()
Lisa Ehrman says
These are really adorable, and I love the fabric choices 🙂
Maria Perez says
Lisa, I just added a post on a drawstring pouch to store these weights in, But I’m also planning a series on what else you can do with this same basic triangle shape. Check back and sew along.
Tomato says
These are so pretty! And you give great directions!
Maria Perez says
Thank you for the compliment. I hope you come back to read the post on the drawstring pouch to store them in.
Anne Weaver says
Beautiful!! I’ve got a Craft Gossip post scheduled for tomorrow that links to your tutorial: http://sewing.craftgossip.com/?p=83278 -Anne
Maria Perez says
Anne, thank you so much. That is very nice of you.
joan says
A gent on Great British Sewing Bee (?) used clean pebbles - effective, but less attractive. Good idea. Paper patterns are so flimsy.
Maria Perez says
Don’t you just love that show. I watch the episodes on YouTube. You can also use heavy washers from the lumber store or pill bottles filled with beans anything really to give it weight to hold the pattern down. I like these though because they are pretty. I also posted a tutorial on a drawstring bag to store them in. It really finished off the gift. Thanks for leaving a comment.
Angela says
I mainly do dressmaking and my whole length of fabric doesn’t fit on to my table even with the cutting board I use, so I have to pin to keep the pattern pieces where I want them as the fabric hangs over the table but has anyone any ideas on using pattern weights in this situation?
Felicia says
Angela, I have the same issue. As I lay pattern pieces I place, I roll the fabric with pattern pieces into a tube shape as is rolling paper onto a tube. As I cut the pieces out individually, I unroll and add weights to the pieces as I cut them out.
Elaine says
Lovely gift idea and so simple to make
Loretta says
Thank you